Disabling Call Waiting
Call Waiting can cause problems such as disconnections and the stalling of your Internet connection. Disabling Call Waiting can resolve those types of issues. This article explains the two methods of setting your TOAST.net connection to disable the phone feature.
Windows 95/98/Me
Method 1:
Double click on My Computer on your desktop.
Within My Computer, double click on Dial-Up Networking.
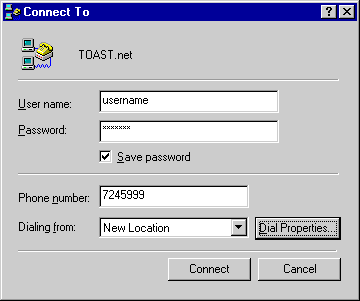
Within Dial-Up Networking, double click on your TOAST.net connection icon (connectoid).
Click on the Dialing Properties... button in the Connect To window.
Within Dialing Properties, check the box that says To disable call waiting, dial: and select the correct code for your phone service in the drop-down box.
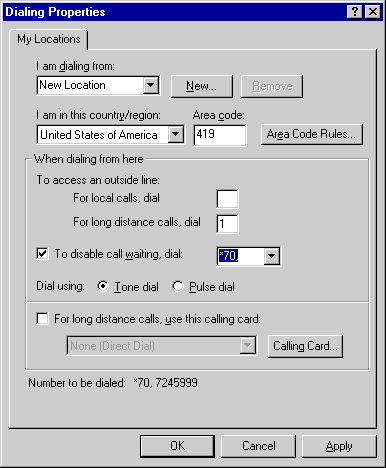
Click OK to save the settings. Your computer will now dial the TOAST.net access number with call waiting disabled.
Method 2 -- If Dial Properties... is not available or if you have a different operating system, the code can be added before your phone number. Here is how to hard code the feature within Microsoft's Dial-Up Networking:
Double click on My Computer on your desktop.
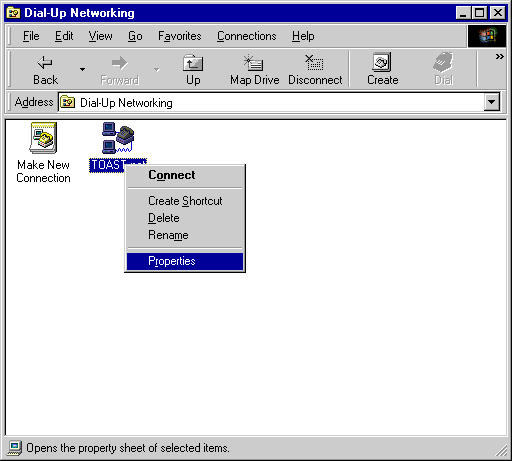
Within My Computer, double click on Dial-Up Networking.
Within Dial-Up Networking, right click on the TOAST.net connectoid and left click on Properties.
Within the TOAST.net properties, click in the Telephone number: field, placing the mouse cursor in front of the number. Type the code, followed by a comma and one space.
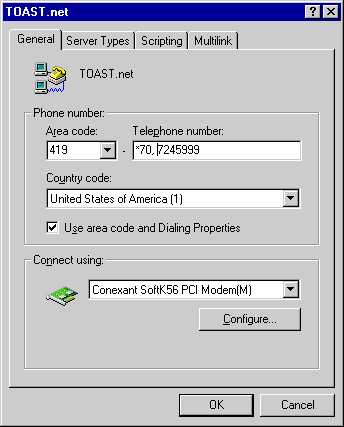
Click OK to save the settings. Your computer will now dial the TOAST.net access number with call waiting disabled.
Windows 2000/XP
Click Start, Settings, and select Control Panel.
Double click on Network Connections (you may need to click Switch to Classic View in Windows XP to see Network Connections).
Double click on TOAST.net. Add *70, in front of the number in the telephone number field.
Click Connect. When asked if you'd like to make the number change permanent, click Yes.
Mac OS 9
Click the Apple icon, Control Panels, and select Remote Access.
Add *70, in front of the number listed.
Close the Remote Access window and save the setting change.
Mac OS 10
Click the Apple icon and select System Preferences. Click the Network icon and select the PPP tab.
Add *70, in front of the number listed.
Click Apply Now to save the setting changes.
Article ID: 157, Created: 12/3/2009 at 9:42 AM, Modified: 4/21/2023 at 4:53 PM