Before you begin...
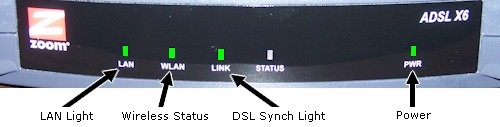
- Below is a front and back view of the Zoom X6. Be certain that the Ethernet cable, phone cable, and power cable are connected properly before continuing setup.
- The LINK light will become solid green when the DSL connection is active.
- LAN lights will become solid green when a computer is turned on and connected to the specified Ethernet port.
- The WLAN light will become lit when the Wireless Network is active.
- The STATUS light should be dark. It will only light if there is a hardware problem with the modem.

Configuring the X6
- Log into the router by typing in the address http://10.0.0.2 in the address bar and pressing the Enter key. When prompted, type the username and password as follows:
Username -- admin
Password -- zoomadsl
- Within Basic Setup, enter the following information:
- Protocol- PPPoE
- Encapsulation- LLC
- VPI -- 0
- VCI -- 35
- Username -- DSL username
- Password -- DSL password
- Click the Save Changes button.
- Click the Write Settings to Flash button.
- Close Internet Explorer or click the Home button to begin surfing the Internet.
Configuring the Wireless Network for WPA encryption
Requires Windows XP, Vista, or OSX.
- Click on the Wireless tab.
- Enter the following information:
- Wireless - Enable
- SSID - The name of your Wireless Network (Typically the user's last name)
- Default Channel - 4
- Profile - 11g+b
- Encryption - WPA
- Key - An 8 character password to give a wireless device access to your Internet connection.
- Click Save Changes and then Write Settings to Flash.
- Close the window and begin using wireless.
Click here for assistance on setting up your computer to use a wireless connection.
Configuring the Wireless Network for WEP encryption
Windows 2000, ME, 98 and Mac OS 9 must use WEP encryption on wireless networks (limited support available).
- Log into the router as shown above.
- Under the Wireless tab, enter the following information:
Wireless -- Enable
SSID -- The name of your Wireless Network (Typically the user's last name)
Hide SSID -- False
Default Channel -- 4
Profile -- 11g+b
Encryption -- WEP 64-bit
- Key 1 -- Enter a 10 character wireless key. You may use the characters A through F, and the numbers 0 through 9. You must separate the key with dashes to look like the following:
a1-b9-c3-d6-f1
- Click Save Changes and then Write Settings to Flash.
- Close the window and begin using wireless. Note: you should *not* use the dashes when typing in your wireless key on your keyboard.