Below is a front and back view of the Netopia Wireless Gateway (versions 1 and 2). Be certain that the Ethernet cable, phone cable, and power cable are connected properly before continuing setup.
Lights:
- DSL Light- Green when a DSL signal is detected. Flashing if no DSL service is found.
- Internet- Green if successfully connected to the Internet (may blink when passing traffic). Dark or red if no Internet connection is found.
- LAN- Flashing green when a computer is connected with an Ethernet cable and traffic is passing over the connection. The lights correspond to the numbers Ethernet jacks on the back of the modem.
- WLAN - Flashing green when the wireless network is active.
Configuring the Netopia Wireless Gateway
- Make sure the computer is plugged into the modem directly with an Ethernet cable. There are 4 ports on the back of the modem- any of the available ports may be used.
- Open a web browser, and enter 192.168.1.1 in the Address bar. Note-on Version 2 model, you will automatically go to this address if no Internet connection is found.
- You will be prompted for a username and password. Use: admin/admin
- You will now see the modem interface. Click on the Wizard Setup link on the left side of the screen.
- On the menu, choose I Have a PPPoE username and password, then click Next.
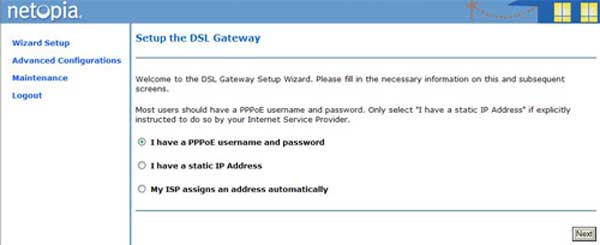
- Enter your complete TOAST.net email address and password as indicated. Click Next.
- The screen will report if the connection was successful. If so, click Done. If it wasn't successful, revise the username/password and repeat setup 6. If a networking or DSL line error is displayed, check the modem connections.
- The Internet light will light green when the connection is successful. Test the connection by browsing to a web page.
Configuring the Wireless Network
Optional Wireless Security Settings
You can change the wireless encryption to WPA for greater security by doing the following:
- Click Advanced Configurations on the left menu.
- Click Wireless Setup on the left menu.
- Next to Privacy, choose WPA - PSK.
- New options will appear on the screen (shown below).
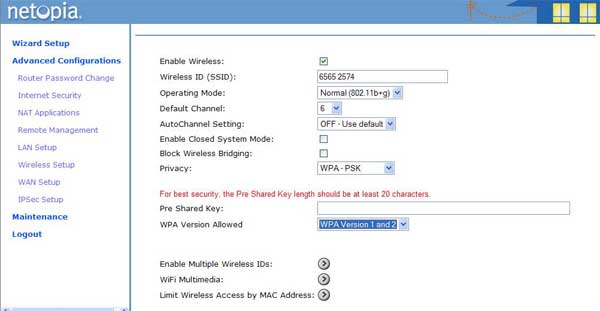
- Next to Pre Shared Key: enter in a wireless key. The key must be a minimum of 8 characters. Numbers, letters, and symbols may be used.
- Click Save Changes when complete.
- Enter the new WPA key into your computer's wireless settings.
Click here for assistance on setting up your computer to use a wireless connection.
Article ID: 139, Created: 12/2/2009 at 4:23 PM, Modified: 11/23/2010 at 10:39 AM